Swing Check Valve: Essential Tool for Water Flow Control
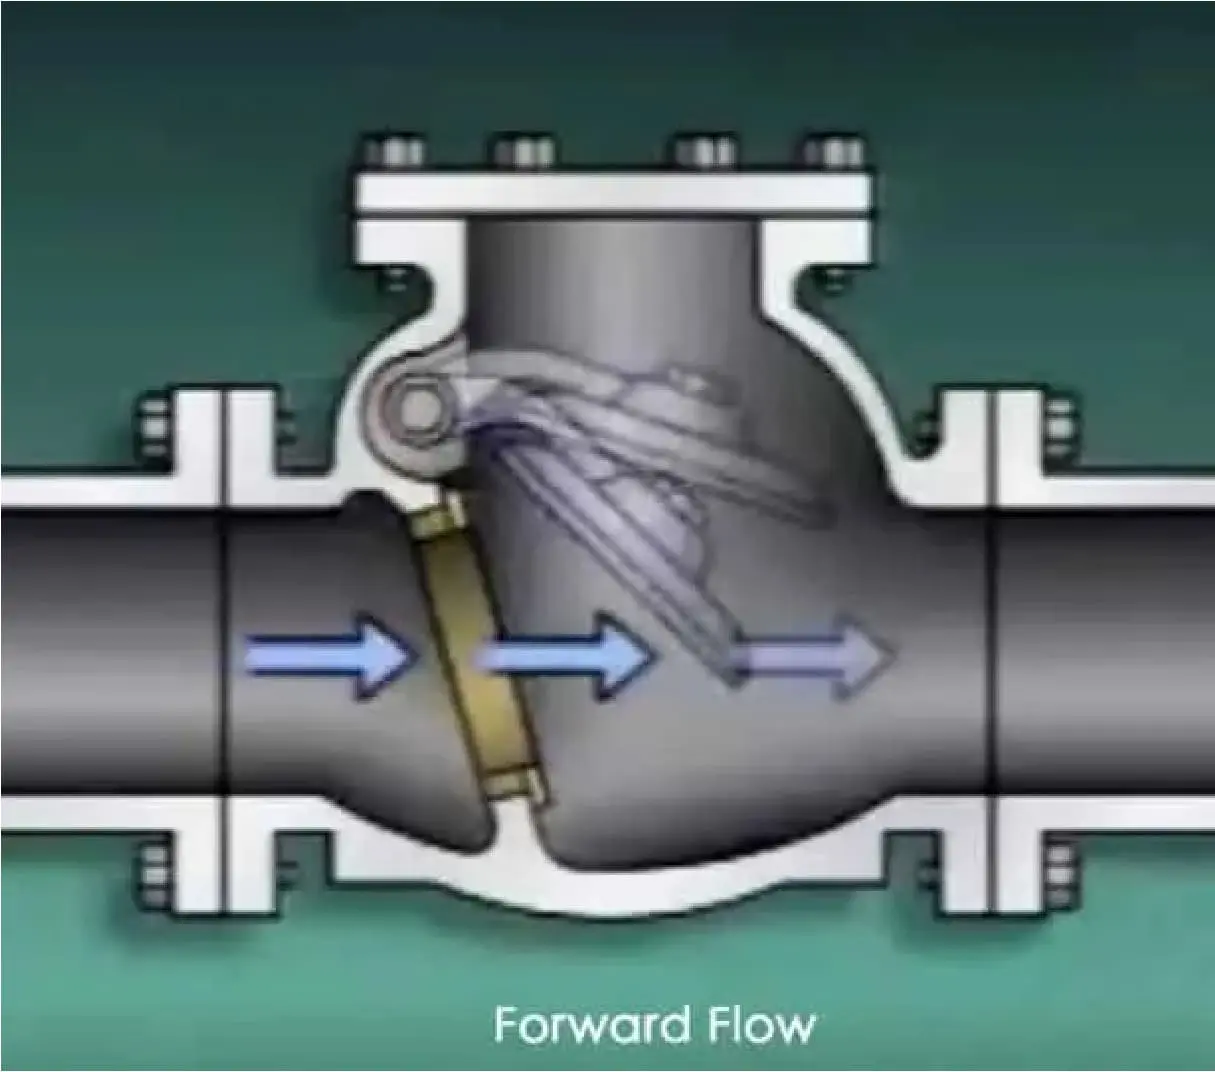
Swing Check Valve Working Principle – Forward Flow Direction
Every piping system needs a quiet guardian that keeps liquid or gas moving in the right direction. That role belongs to the check valve. Among the many designs available, the swing check valve remains a favorite for water, HVAC, and general industrial duties because it is reliable, simple to service, and forgiving of real-world conditions.
This guide breaks down how check valves work, with a deep look at swing check valves, their parts, sizing, installation tips, and the choices you face when picking one for your system.
Why one-way flow matters
Reverse flow can undo pump work, contaminate upstream equipment, and create damaging pressure spikes when flow suddenly changes direction. A check valve opens automatically with forward flow and closes during reverse flow. No actuator. No operator. Just physics.
That is why you will see them on pump discharges, along chemical injection lines, in building risers, and in fire protection mains. When they do their job well, you hardly notice them.
How a swing check valve works
A swing check valve uses a disk that pivots on a hinge pin. When fluid moves in the intended direction, the flow pushes the disk open. When flow slows, stops, or reverses, the disk swings back onto the seat and blocks reverse flow.
Cracking pressure
The minimum differential pressure needed to start opening the disk. For swing check valves, it is usually very low, often in the range of .25 to 1 psi.
Full open position
At steady forward flow, the disk lifts nearly out of the stream path. Lower velocities may hold the disk at a partially open angle.
Closure
As forward flow decays or reverses, gravity and reverse pressure swing the disk shut.
Important: Closure behavior affects noise and shock. A disk that slams shut after reverse flow has accelerated can create a pressure surge known as water hammer. Some swing check valves include a lever and weight or a dashpot to control the closing speed. Others add a torsion spring on the hinge to encourage quicker seating.
Inside the valve: key parts and materials
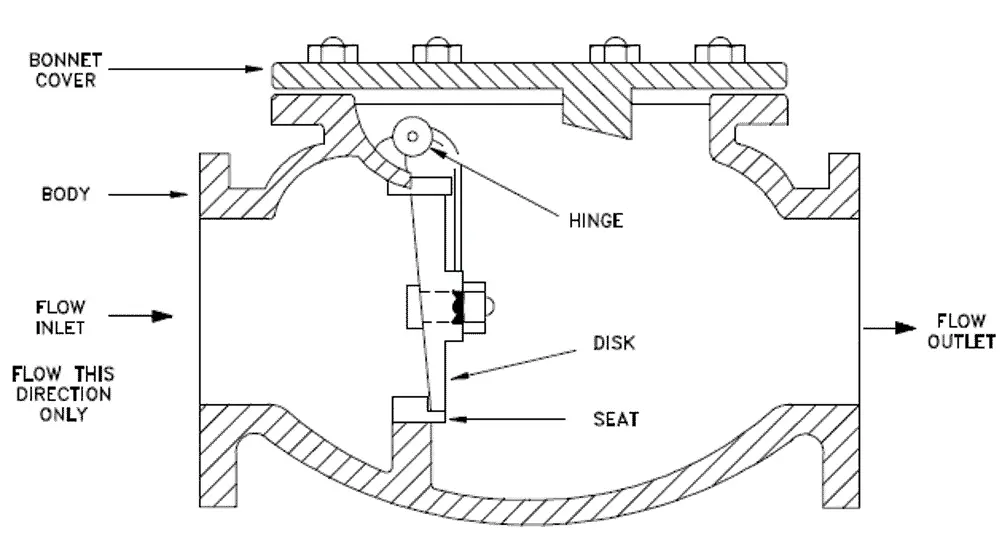
Swing Check Valve Components and Parts Diagram
A swing check valve’s simplicity is part of its appeal. Common components include:
Key Components
- Body and cover: typically cast or forged. The cover allows access to internal parts.
- Hinge pin and bushings: support the disk arm. Bronze or stainless bushings reduce wear.
- Disk and arm: the moving element that seals against the seat.
- Seat or seat ring: metal or soft insert that the disk seals against.
- Gaskets and fasteners: sealing and bolting between body and cover.
- Stop pin: limits the disk travel in the open position.
Material Choices
- Cast iron or ductile iron for municipal water and HVAC
- Carbon steel for hydrocarbons and general industrial service
- 304 or 316 stainless for corrosive media and higher temperatures
- Bronze for seawater and brackish services in smaller sizes
- PVC or CPVC for low-pressure corrosive chemicals at moderate temperatures
Seat Options:
Where swing check valves shine
Advantages
- Low cracking pressure and minimal moving parts
- Easy access for maintenance through the top cover
- Good tolerance of particles and light solids
- Common in larger diameters and waterworks
Tradeoffs to consider
- Higher pressure drop than a straight pipe, especially if the disk is not fully open
- Potential for noisy closure if flow reverses quickly
- Sensitivity to low flow that can induce disk flutter or chatter
Not all check valves behave the same
Lift, ball, dual plate, and silent check valves have different closure dynamics, pressure drop, and orientation limits. The best choice depends on the process and pipeline layout.
| Check Valve Style | Pressure Drop | Orientation Flexibility | Closure Speed | Slam Risk | Size Range |
|---|---|---|---|---|---|
| Swing | Low to moderate | Horizontal and vertical upflow | Moderate | Medium if reverse flow develops | 2 to 72 in |
| Lift (piston) | Moderate to higher | Usually horizontal | Slow to moderate | Lower, but can chatter at low flow | 1 to 12 in |
| Ball | Low | Any | Fast | Low | 1 to 8 in |
| Dual plate (wafer) | Low | Horizontal and vertical | Quick | Lower, non-slam style | 2 to 60 in |
| Silent/nozzle | Very low | Any | Very quick, spring-assisted | Very low | 1 to 36 in |
A non-slam or silent check uses a spring-loaded disk that closes before reverse flow accelerates, which cuts noise and surge. For pump discharge lines that see frequent starts and stops, that feature can pay off.
Picking the right valve for your job
Start with the service conditions, then match the valve style and materials. A short checklist helps narrow choices:
System Parameters
- Fluid: clean, dirty, viscous, or with entrained solids
- Minimum, normal, and peak flow rates
- Temperature and pressure range
- Pipe size and schedule
- Installation orientation and available face-to-face length
Performance Requirements
- Allowable pressure drop
- Cracking pressure needs
- Water hammer sensitivity and need for non-slam behavior
- Maintenance access and isolation points
- Materials and seat compatibility with the medium
Application Examples:
Sizing without the guesswork
A swing check valve should open fully at normal flow and still seat without chatter at low flow. Here is a practical approach:
1. Confirm pipe size based on acceptable velocity
Water systems commonly target 3 to 10 ft/s, with 6 to 8 ft/s a frequent middle ground.
High velocities increase pressure drop and surge risk. Very low velocities lead to disk flutter.
2. Select valve size
Select a valve in the same nominal size as the pipe unless space or performance suggests a change.
3. Check pressure drop
Check the manufacturer’s Cv and approximate pressure drop at normal flow.
4. Verify minimum flow
Verify minimum flow for stable disk position.
Many swing check valves need a certain velocity to fully open the disk. If the disk hovers mid-travel, you may hear chatter. Data sheets often show minimum velocity to stabilize the disk.
Note: Many swing check valves are designed to handle system pressures up to 250 psi (+1) in suitable applications. Where low flow is common, consider a smaller valve with reducers, or switch to a silent check that holds the disk with a spring.
Installation that sets you up for success

Swing Check Valve Installation Behind Water Pump Outlet
Care during installation pays off for years. A few rules of thumb:
DO
- Clean the line before installing to remove debris
- Check arrow markings on the body for flow direction
- Torque bolts to the specified values in a star pattern
- Provide straight pipe to minimize turbulence
- Use proper pipe supports for large valves
AVOID
- Installing in vertical downflow
- Trapping debris under the disk during assembly
- Using incompatible gasket materials that creep or cold-flow
- Putting weight on pump nozzle
- Creating twisting forces across flanged joints
Key Installation Guidelines:
- Orientation: horizontal lines are ideal. Vertical lines should have upward flow through the valve.
- Upstream and downstream runs: provide straight pipe to minimize turbulence.
- Distance from pumps: place the check valve on the discharge side, then an isolation valve.
- Access: leave room to remove the cover and disk for service.
Water hammer and quiet closure
Water hammer is a pressure surge caused by rapid changes in flow. When a check valve slams shut after flow reverses and accelerates, the energy converts to a sharp pressure wave. You may hear a bang and see the gauge needle jump.
Ways to cut surge:
Maintenance that keeps things tight
Swing check valves are serviceable in place on many lines. Routine care focuses on the parts that move and seal.
Inspect
Look for signs of leakage, vibration, and unusual noise during operation.
Test
Hydrostatic shell and seat tests follow API 598 on metallic valves. For waterworks, AWWA C508 guidance applies.
Clean
Remove debris from the body cavity and disk. Sediment can hold the disk off the seat.
Common symptoms and quick fixes:
Final notes for smooth operation
A check valve should be almost invisible in day-to-day operation. The best sign of success is the absence of noise, the absence of backspin on a pump, and a maintenance log that stays short.
Pick thoughtfully, install with care, and give the internal parts the occasional checkup. Your piping will thank you with quiet, predictable service.
Contact Our Valve Experts
Need help selecting the right check valve for your application? Our technical team is here to assist you.